
our team installs your furniture to the agreed scope. Use this manual for everyday adjustments and use; for relocation, major reconfiguration or replacement parts, contact Furnisys support.
The product range at a glance
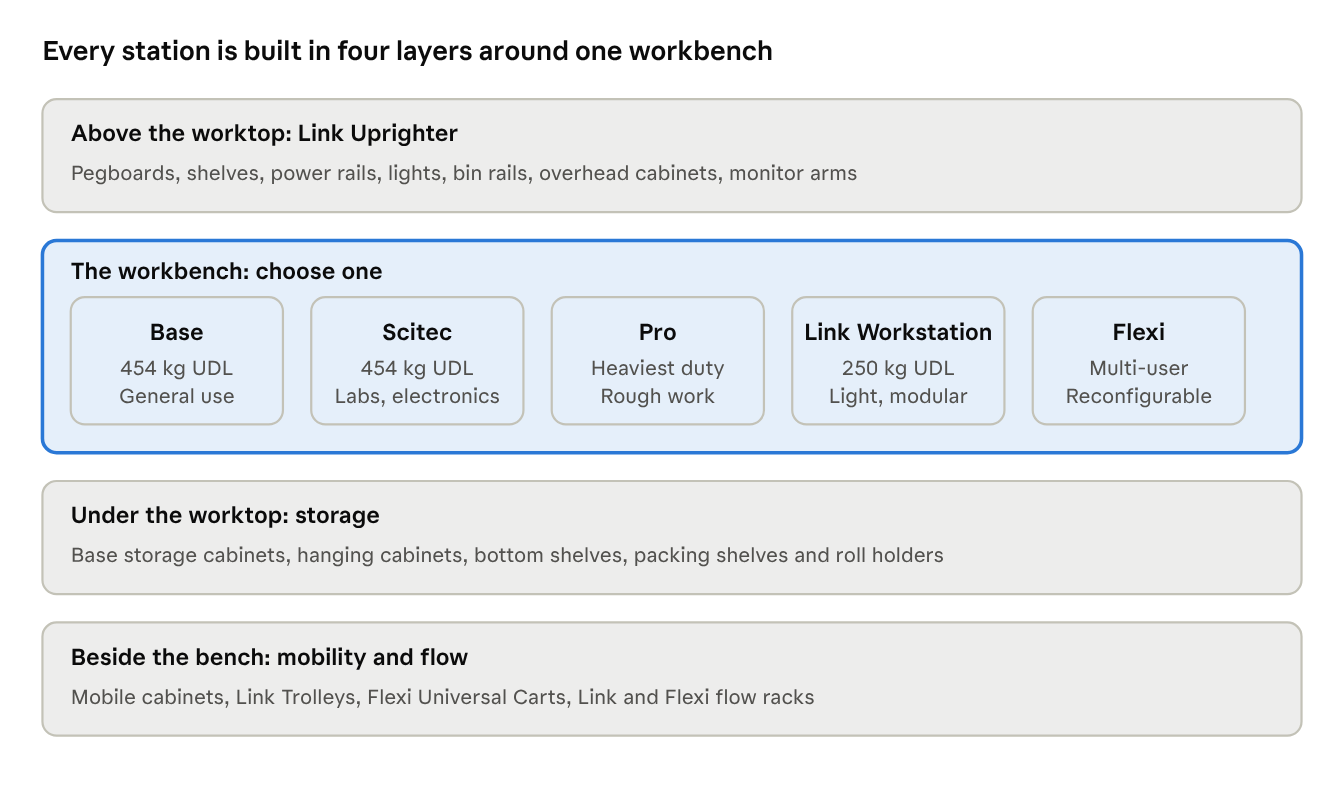
Pick one workbench, then add what your task needs above it, under it and beside it. Link accessories fit Base, Scitec and Pro benches alike, so a station can grow as your process changes.
Before you start
Placing your furniture
Place the bench on a firm floor, away from walkways and door swings.
Leave enough room behind it to reach power points and to move chairs or trolleys.
Keep heavy machines and precision instruments, such as balances, on separate benches, so vibration from one does not affect the other.
Levelling the bench
Every bench stands on levelling glides. On uneven or trimix floors, your bench may have threaded stud levellers (M12 x 25) with 10–15 mm of adjustment.
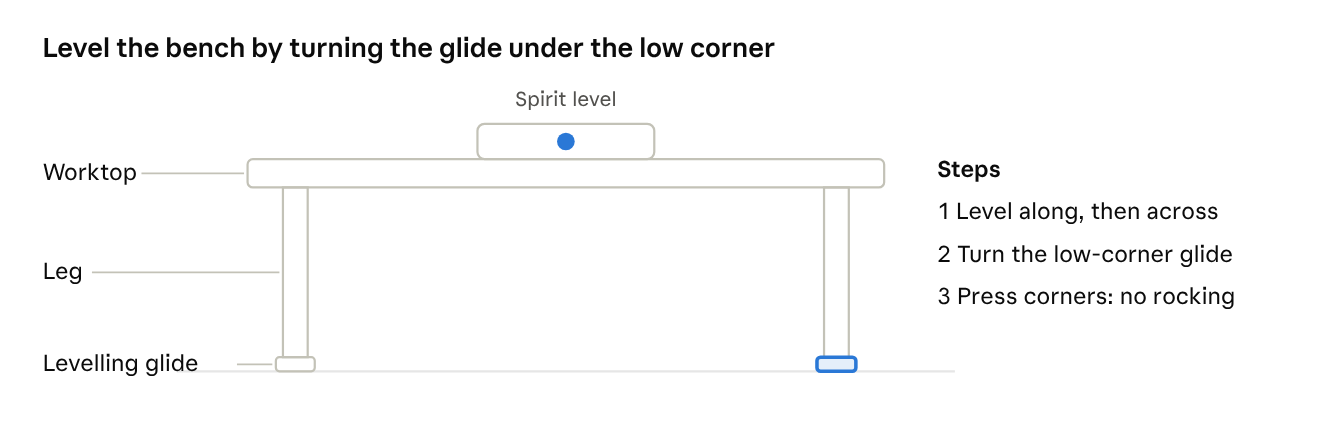
Place a spirit level on the worktop, first along its length, then across its depth.
Turn the glide or leveller under the low corner until the bubble is centred.
Press down on each corner. If the bench rocks, adjust the glide under the corner that lifts.
Re-check the level whenever the bench is moved or a heavy machine is added.
Check before first use
All legs, frames and uprights are firmly in place and nothing moves when you push the worktop.
Castors on trolleys and mobile cabinets lock and unlock.
Power rails and outlet strips are connected to a suitable supply by a qualified electrician.
Using your workbench: Base, Scitec and Pro
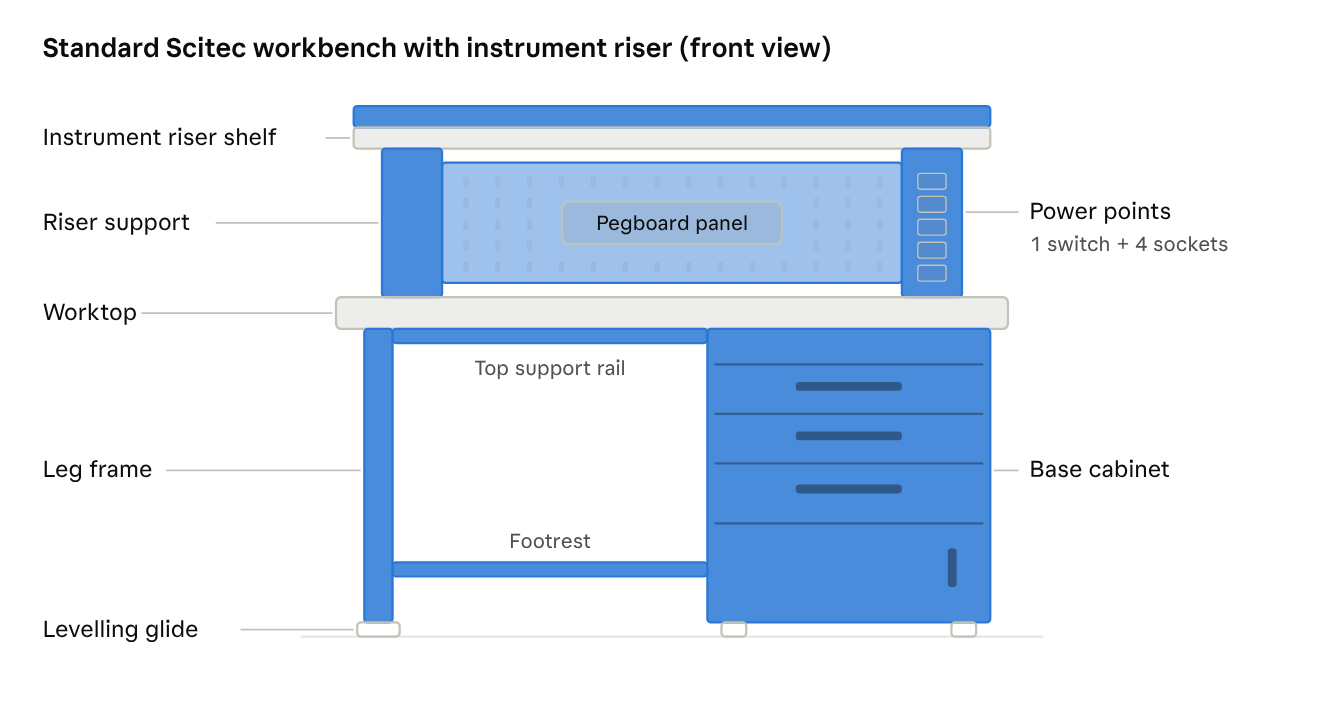
This is the standard Scitec configuration: one leg frame, one base cabinet and an instrument riser with a pegboard panel. Your bench may instead have leg frames at both ends, base cabinets at both ends, or an adjustable riser shelf; the part names are the same on Base and Pro benches.
Setting the working height
Choose a height that keeps the operator's shoulders relaxed: about 750–850 mm for seated work and 900–1100 mm for standing work.
| Workbench | How to change height |
|---|---|
| Base | Fit leg extenders in 2" steps, up to 6" (overall 32" to 42"). Use a set of 4 extenders, or 6 where the bench has a middle leg. |
| Scitec | Fit leg extenders in 1" steps, up to 6" (set of 4). |
| Pro | Height is set by the leg size (700 to 1000 mm). Ask us for a different leg height. |
Always fit extenders to every leg at the same height, then re-level the bench.
Placing loads on the worktop
Spread weight across the worktop. Base and Scitec benches carry 454 kg UDL.
Put heavy machines over or close to a leg frame or base cabinet, not in the middle of a long span.
Keep the support rails and extra leg in place on long benches (84" and wider); do not remove them to gain legroom.
Use a rubber mat under tools and parts that could scratch or dent the worktop.
Using the shelves below the worktop
Base undershelf (12" or 18" deep): for boxes and spare stock you need daily.
Scitec bottom shelf: telescopic; up to 45 kg UDL.
Pro bottom shelf: telescopic heavy-gauge steel; up to 68 kg UDL.
Footrest: rest your feet on it when seated; do not stand on it.
Using hanging drawers and cabinets
Base hanging drawers slide along the underside of the worktop. Move them to the position that suits the operator, sitting or standing.
Scitec and Pro hanging cabinets hold up to 22.5 kg per drawer. Keep them at the opposite end from a bench vice or keypad.
Pull drawers out by the integrated handle; close them fully before moving around the bench.
The shallow lap drawer has no lock, so do not keep valuables in it.
Using the riser shelf (above the worktop)
Base riser shelf: sits on steel box supports, 19" high. If an electrical panel insert is fitted, it gives a breaker-protected socket at the back of the bench.
Scitec and Pro adjustable riser shelf: the support brackets move in 1.5" steps, from 12" to 18" above the worktop. Lift the shelf off, move both brackets to the same notch, and refit it.
Scitec instrument riser: put oscilloscopes, meters and laptops on the riser to keep the worktop clear. If your supports have power, plug instruments into the riser's switch sockets (1 switch + 4 sockets).
Using the outlet strip (Base)
The 48" outlet strip, mounted on top of or under the worktop, has 8 outlets of 6/16 A (7 sockets + 1 MCB), an on/off switch and a circuit breaker. Switch it off at the end of the shift. If the breaker trips, unplug the last device added before resetting it.
Using back stops and end stops
Back stops stand 4" above the worktop on Base benches, and stop small parts from rolling off. On Scitec and Pro, end stops have rounded corners and are 2" shorter than the worktop depth, so you can still slide items on from the front.
Using the Link Uprighter and its accessories
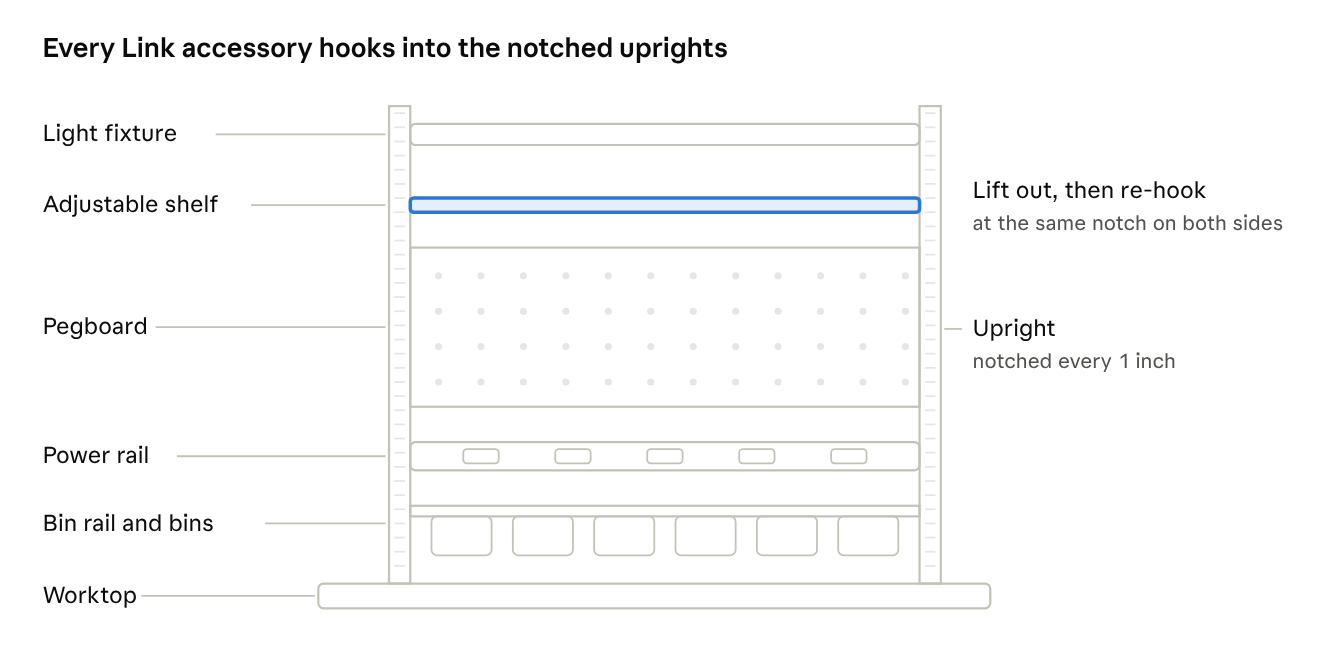
The Link Uprighter is the steel frame standing on your worktop. Its uprights are notched front and back every 1", and every Link accessory hooks into these notches.
Moving an accessory to a new height
Clear everything off the accessory.
Lift it upward and out of the notches.
Hook it into the new notches, at the same height on both uprights.
Press down until it seats fully, then check that it sits level before loading it.
Using each accessory
| Accessory | How to use it | Limit |
|---|---|---|
| Adjustable shelf (12" or 15" deep) | Mount it with the lip at the front to hold items, or turn it round with the lip at the back as a back stop | 45 kg UDL |
| Shelf dividers (4", 6", 8" high) | Fit over the shelf edge to separate items; only when the shelf is flat (0°) | — |
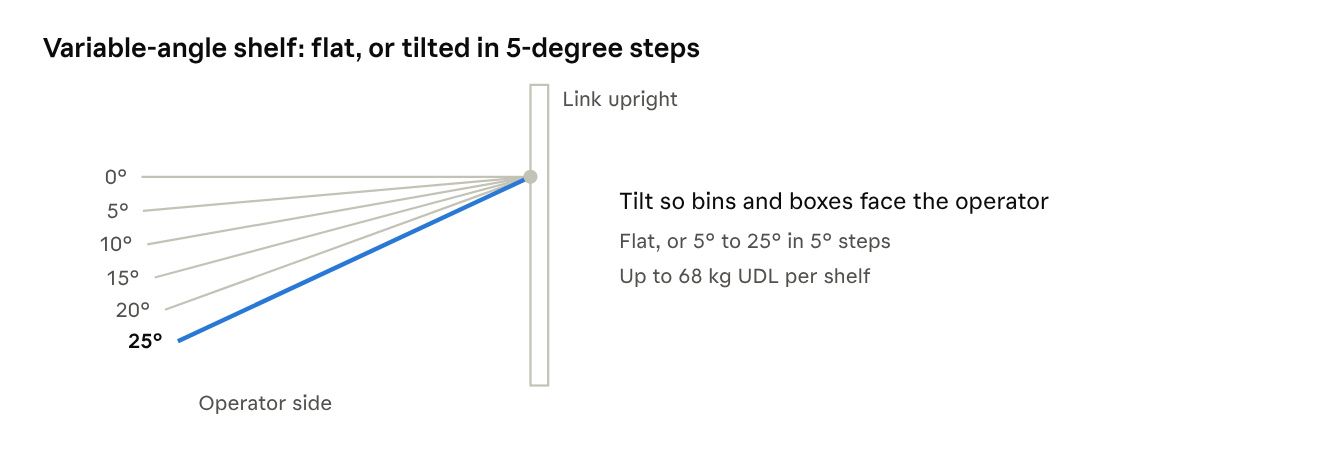
| Variable-angle shelf (18" or 24" deep) | Set flat, or at 5°, 10°, 15°, 20° or 25°, so bins and boxes face the operator | 68 kg UDL |
| Pegboard (1/4" holes) | Push standard hooks and holders into the holes; place the most-used tools at eye level | — |
| Solid panel | Hold notes and parts with magnets; mount a marker board or tack board on it for SOPs | — |
| Bin rail | Hang plastic bins along it; mount it flat or at 15° so the bin openings face you | — |
| Tool rail | Hang tools from the tool-rail brackets along the length of the bench | — |
| Swing-arm tool rail (36") | Swings 180° on a single upright; swing it out of the way when not in use | 13 kg |
| Equipment shelf, accessory shelf | On an articulating arm that swings 180°; position it, then load it | 30 kg each |
| Document holder | On an articulating arm; swing it in front of you to read drawings and instructions | — |
| Bin container | Three rows of bins on an articulating arm; needs an accessory shelf for support, or can stand on its own | 20 kg |
| Single upright | Mounting point for power or an arm where a full frame is not needed | 27 kg |
| Overhead cabinet | Store bulk items and things you need often; the shelf in 29" cabinets adjusts in 1.5" steps | — |
| Air-hose attachment | Clip the air hose to the upright so it does not cross the worktop | — |
Using the power rail
Horizontal power rail: runs between two uprights with 15 A switch sockets. Pivot it up or down so the sockets face you.
Vertical power strip: runs up one upright with a 15 A switch socket.
Switch off and unplug equipment before moving the rail or any accessory near it.
Using the lights
Overhead light fixture (2 or 4 lamps): tilt it up to 10° up or down to remove glare and shadows on the work.
Fixed tube light with reflector: gives even light along the whole bench.
LED undershelf light: fixes by magnet under a shelf or cabinet. Slide it along to light the exact work area.
Using Link Workstations, Workstands, Trolleys and Flow Racks
Link Workstation and Workstand
A Link Workstation carries up to 250 kg UDL on its worktop. Spread the load and keep heavy items near the uprights.
A rear-justified workstand takes accessories on the front only; stand it against a wall or a bench.
A centre-justified workstand takes shelves, pegboards, bin rails and power rails on both sides, so two operators can work back to back. Load both sides evenly so it stays balanced.
All accessories fit and adjust exactly as on the Link Uprighter (chapter 3).
Link Trolley
Before moving: clear loose items from the shelves, and swing arms and tool rails in against the frame.
Unlock the two locking castors.
Push using the handle, not the shelves or pegboard. Move slowly over thresholds and ramps.
At the work point: lock both locking castors before loading, unloading or working from the trolley.
Angle the shelves so items face you: variable-angle shelves set flat or at 5° to 25°, at any height on the frame. Keep heavy items on the lowest shelves.
The trolley stands 6" taller than its frame (48" or 60") because of its 5" castors.
Link Flow Rack
A flow rack moves boxes and bins by gravity on sloped roller shelves, so the oldest stock is always picked first (FIFO).
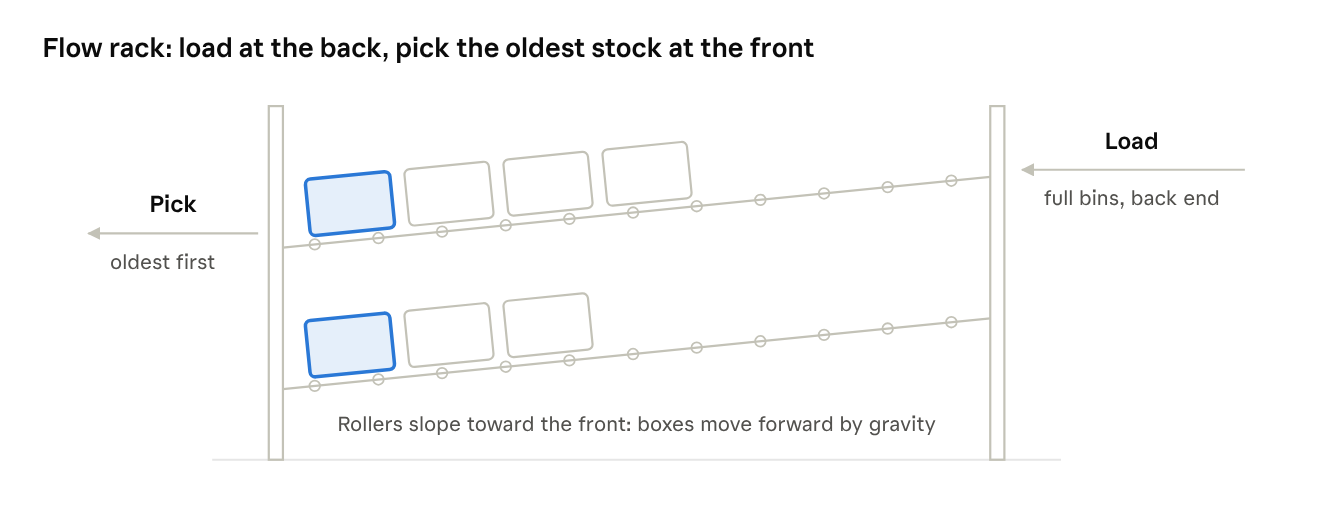
Load from the back (the high end): place full bins or boxes on the rollers and let them roll forward.
Pick from the front (the low end), where the oldest stock waits.
Return empty bins: take them out at the front, refill them, and load them again from the back.
Do not overload: each roller shelf takes up to 270 kg UDL, and the whole structure up to 800 kg UDL.
Keep the rollers clear of tape, labels and debris so boxes keep flowing.
Add a worktop to the front of a flow rack to turn it into a picking or kitting workstation.
Using the Flexi System
Understanding the slots
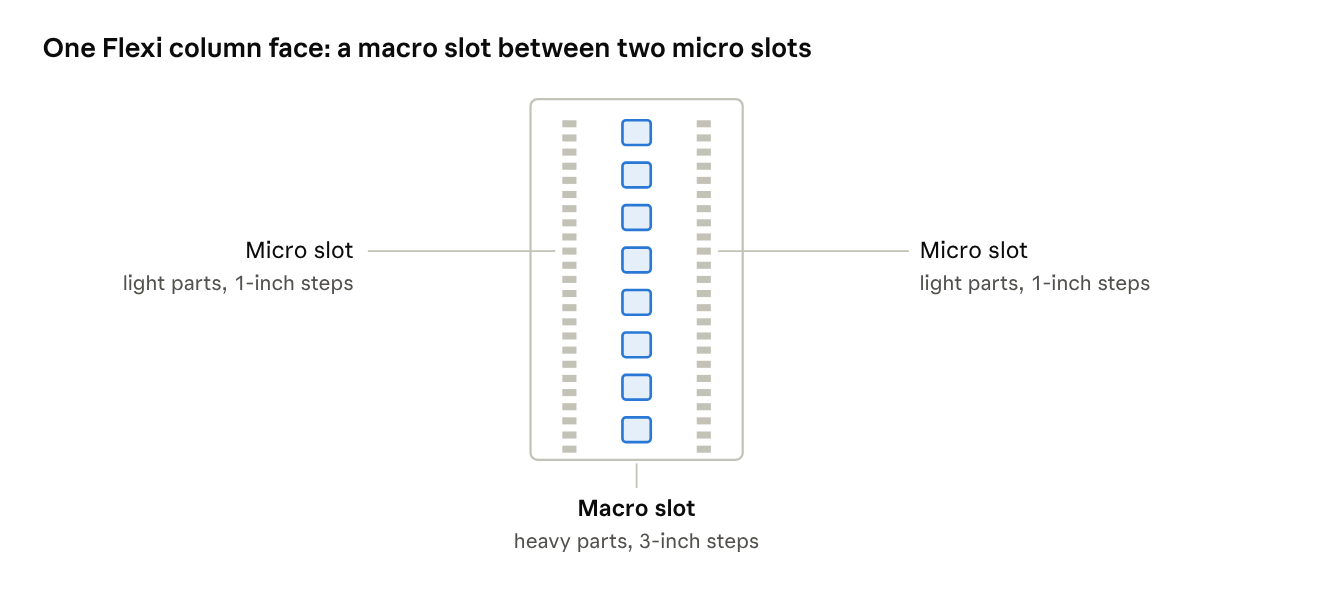
Each Flexi column has one large macro slot and two small micro slots on each side.
| Slot | What fits in it | Adjusts in steps of |
|---|---|---|
| Macro (centre) | Heavy parts: worktop brackets, steel shelves (136 kg UDL) | 3" |
| Micro (left and right) | Light parts: power beams, bin rails, back stops, variable-angle shelves, utility bins, overhead cabinets, steel shelves (68 kg UDL) | 1" |
Columns are double-sided, so the same column can carry parts for the workstation behind it.
Changing the worktop height
Clear the worktop and unplug equipment.
With two people, lift the worktop and its support brackets out of the macro slots.
Re-hook the brackets in the new macro slots, at the same height on every column (steps of 3").
Lower the worktop and check that it is level before loading.
Use this to switch a station between seated and standing work.
Using Flexi accessories
Steel shelves: set flat or tilted. In macro slots they tilt to 15° or 30°; in micro slots, to 15°. Fit shelf lips when tilted so items do not slide off.
Variable-angle shelf: flat or 5° to 25°, in micro slots.
Panel joiner kit: joins 12" and 18" pegboard and solid panels to span 48", 60" or 72" without an extra upright. It cannot be used with marker boards or tack boards.
Label and roll holder: 1" rod, takes up to 100 lb (about 45 kg). Use the interior mount for labels and the extended mount for paper and bubble rolls.
Airgun holder: mounts on the worktop support beam, keeping the air gun off the work surface.
Adding a workstation or changing the layout
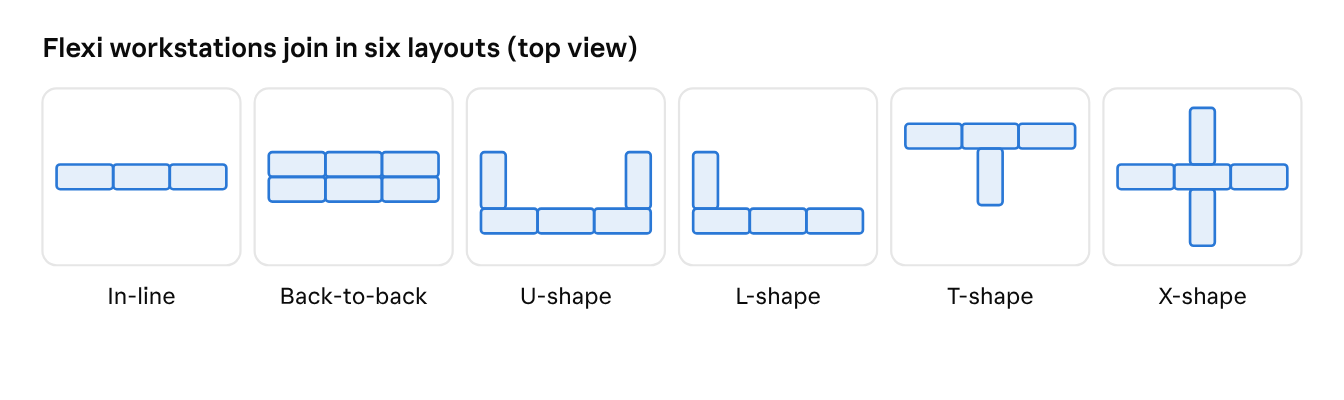
Flexi starter and adder sections share columns. A line can be rearranged in-line, back-to-back, or in U, L, T or X shapes, and extra adders can be added later. Contact us before reconfiguring, so we can supply the right adder sections, outriggers and worktops.
Flexi Universal Cart
Unlock the two locking castors to move the cart; lock them when parked.
Load heavier parts on the lower shelves. Shelves are up to 14" deep.
The 3.5" rubber castors do not mark floors, so the cart can be used in clean areas.
Flexi Flow Rack
Use it the same way as the Link Flow Rack: load from the back, pick from the front. The structure carries up to 630 kg UDL. If casters are fitted, lock them before loading or picking.
Using packing accessories
Loading a roll holder
Lift the 1" rod out of its brackets.
Slide the roll of film, paper, bubble wrap or labels onto the rod, so the material unrolls toward the operator.
Drop the rod back into both brackets.
Pull the material forward and cut it at the worktop edge.
| Roll holder | Use it for | Limit |
|---|---|---|
| Extended mount (on Link uprights) | Large rolls: paper, bubble wrap, stretch film. It sits 3" forward of the uprights. | 45 kg |
| Interior mount (between Link uprights) | Labels and small rolls | 45 kg |
| Leg or cabinet mount | Rolls under the worktop; needs packing bench leg inserts | — |
Organising shelves and dividers
Bottom shelf (16" deep): slot the 15"-deep solid dividers (6", 10" or 18" high) into it, and keep each carton size in its own bay.
Leg inserts: fit packing bench leg inserts between Scitec or Pro legs to add a second bottom shelf or a roll holder.
Adjustable shelves: vertical solid dividers (6", 10", 18") keep tape, labels and small cartons upright.
Deep shelves without lip (18" or 24"): slide large cartons on and off easily; up to 68 kg UDL.
A good packing routine
Keep tape, cutters and the label printer within 450–500 mm of the operator.
Keep spare rolls and cartons within 1000 mm, on shelves or under the worktop.
Plug sealers, scales and printers into the bench power rail, not extension boards.
Pin the packing instructions or SKU list to the tack board or marker board at eye level.
Using storage and mobile cabinets
Opening, closing and locking
Pull a drawer by its integrated handle; it runs on heavy-duty slides.
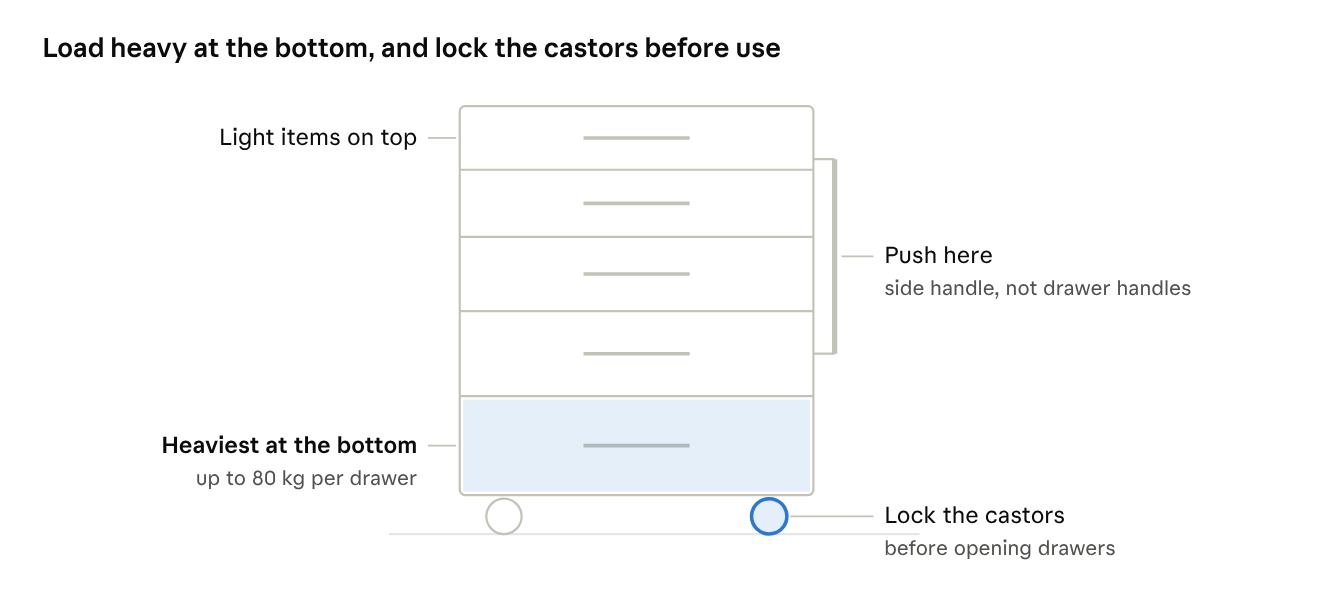
Open one drawer at a time, especially on mobile cabinets, so the cabinet cannot tip forward.
Close every drawer fully before moving the cabinet or walking away.
Use the cabinet's lock at the end of each shift to protect tools and instruments.
Loading the drawers
| Cabinet | Drawer slide rating |
|---|---|
| Base storage cabinet | 60 kg UDL per drawer |
| Mobile cabinet | 80 kg UDL per drawer |
| Hanging cabinet (Scitec, Pro) | 22.5 kg per drawer |
Put the heaviest tools in the lowest drawers and the lightest at the top.
Spread weight across the drawer; do not pile it at the front.
Use drawer partitions or foam cut-outs so every tool has a place and missing tools are easy to spot.
Moving a mobile cabinet
Close and lock all drawers.
Unlock the castors.
Push using the tubular side handle, not the drawer handles.
At the work point, lock the castors before opening drawers or working on the top.
Moving a base storage cabinet
Forklift base (2"): slide the forks into the base, lift slightly and move slowly. Empty the top drawers first.
Frame base (2", 4" or 6"): levelling glides adjust the height. Re-level the cabinet after moving it.
When base cabinets support a Scitec or Pro worktop, do not move them separately: contact us to relocate the whole bench.
Using the ESD kit
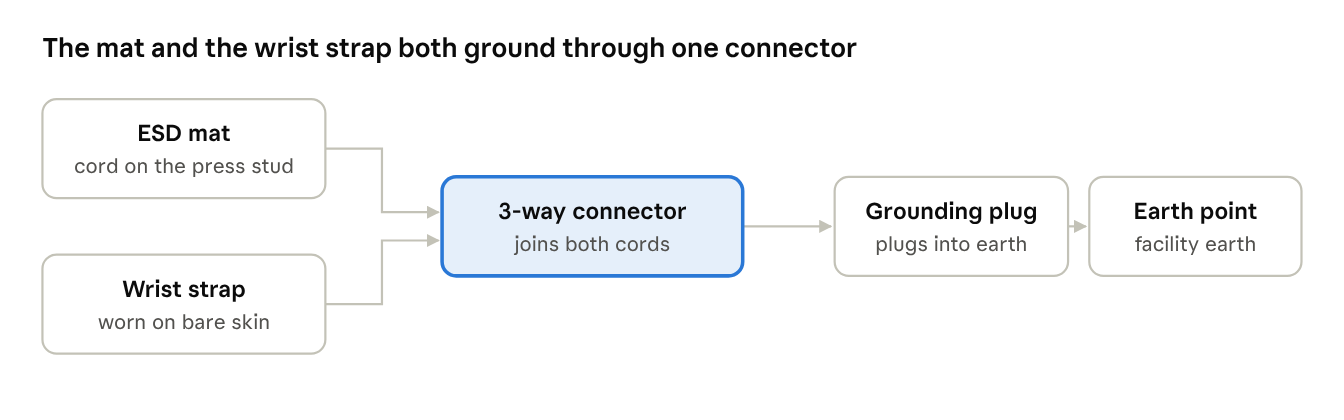
Your ESD kit protects static-sensitive electronics such as PCBs, sensors and chips. It includes a 2 mm grey ESD mat (unless your worktop is electrostatic laminate), a wrist strap, grounding cords, press-stud buttons, a grounding plug and a 3-way connector.
Setting up
Lay the ESD mat flat on the worktop, or use the electrostatic laminate (PELW) worktop directly.
Snap a grounding cord onto the mat's press stud.
Connect the cord to the 3-way connector, then connect the grounding plug to your facility's earth point.
Connect the wrist-strap cord to the 3-way connector as well.
Every time you work
Put the wrist strap on, snug against bare skin, before touching any sensitive part.
Check that the strap's cord is clipped to the connector.
Keep plastic bags, foam and paper away from the mat; they hold static.
Take off the strap only when you leave the bench.
For full protection, use ESD flooring and footwear as well. Ask us to recommend a flooring provider.
Load limits at a glance
| Product or part | Maximum load |
|---|---|
| Base and Scitec workbench | 454 kg UDL |
| Link Workstation | 250 kg UDL |
| Link Flow Rack: structure / each roller shelf | 800 kg / 270 kg UDL |
| Flexi Flow Rack | 630 kg UDL |
| Flexi steel shelf: macro / micro slot | 136 kg / 68 kg UDL |
| Variable-angle shelf | 68 kg UDL |
| Link adjustable shelf | 45 kg UDL |
| Bottom shelf: Scitec / Pro | 45 kg / 68 kg UDL |
| Packing deep shelf | 68 kg UDL |
| Base storage cabinet drawer | 60 kg UDL |
| Mobile cabinet drawer | 80 kg UDL |
| Hanging cabinet drawer | 22.5 kg |
| Equipment or accessory shelf on arm | 30 kg |
| Single upright | 27 kg |
| Bin container | 20 kg |
| Swing-arm tool rail | 13 kg |
| Roll holder | 45 kg |
For the Pro Series, ask us for the rating that applies to your machine or load.
Care, cleaning and troubleshooting
Everyday care
Laminate worktops (PLW, PELW, HPL): wipe with a damp cloth and mild detergent. Wipe spills straight away.
Stainless steel and GI worktops: wipe clean after each shift, especially after oil, coolant or chemicals.
Rubber and ESD mats: keep them clean and flat; replace a mat that is cut or curling.
Steel frames and cabinets: dust with a dry or slightly damp cloth.
Castors and slides: keep them free of swarf, dust and packing debris.
Weekly checks
The bench is level and does not rock.
Shelves and accessories are fully seated in their slots.
Castors lock firmly.
Power cords, rails and outlet strips are undamaged.
Troubleshooting
| Problem | Likely cause | What to do |
|---|---|---|
| Bench rocks or wobbles | Floor uneven, or the bench was moved | Adjust the levelling glides (chapter 1) |
| Shelf sits at an angle | Brackets hooked at different heights | Lift it out and re-hook both ends in matching notches |
| Drawer is hard to open or close | Overloaded, or debris in the slides | Remove some weight; clean the slides |
| Trolley or cabinet drifts | Castors not locked | Lock the castors before working |
| Outlet strip has no power | Breaker tripped | Unplug the last device added, then reset the breaker |
| Boxes stop on a flow rack | Debris on rollers, or the box is too light or soft | Clear the rollers; put soft items in a rigid bin |
| Static shocks at an ESD bench | Mat or strap not connected | Check the cords to the 3-way connector and the earth point |
If a problem continues, or a part is damaged, stop using that part and contact us.
Support and contact
We supply spares and add-ons for every system, and our team can relocate or reconfigure your furniture.
Customer support: support@furnisys.co (Mon–Sat, 10 am–7 pm)
Call or WhatsApp: +91 70457 63012
New enquiries: enquiry@furnisys.co
Website: furnisys.co.in